Install Kubernetes 1.26 on Ubuntu 20.04 or 22.04 LTS
Step by step installation of 3 workers node Kubernetes 1.26 Cluster on Ubuntu Focal Fossa & Jammy Jellyfish

❗️ Updated for Kubernetes v1.26 - without dockershim💥
What is the goal ?
- After completing all the steps below, you will have a 3-node Kubernetes 1.26 Cluster running on Ubuntu Focal Fossa or Jammy Jellyfish.
What do we need ?
- Ubuntu Live Server 20.04 or 22.04 images. You can find the images in ISO format here https://ubuntu.com/download/server.
- 4 Virtual Machines on the virtualization software of your preference. Setup 4VMs, one as a master node (3072 MB RAM, 1 vCPU), and three as workers (2048 MB RAM, 1 vCPU).
- Two distinct networks one NAT Network and one Host-Network (as I said I am using VirtualBox and this part will be based on its capabilities as well)
I am using VirtualBox for all my labs; I setup one base-image and then export it as OVA, which helps me spinning new VMs in seconds. I strongly advise you to do so.
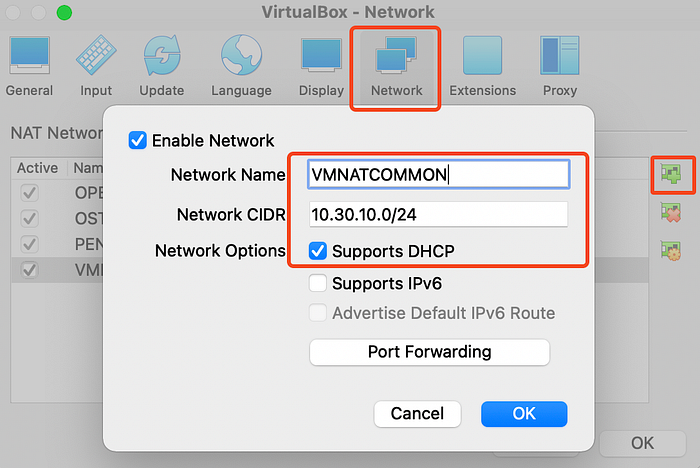
Let’s lay some groundwork for the networks first. Create a dedicated named NAT Network for the lab:
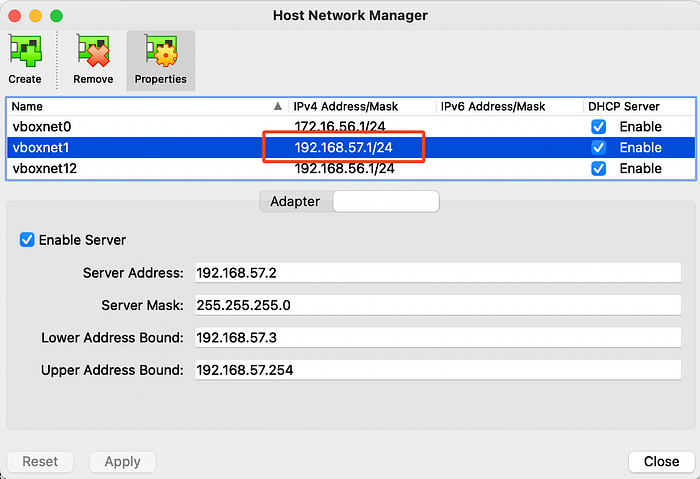
and then a Host Network:
in every single VM assigned the NICs to the respective networks as following:

Configure host names and machine ids
If you have created the virtual machines either with cloning or via an OVA then you have to make sure that its machine have a unique machine id:
sudo rm -rf /etc/machine-id
sudo dbus-uuidgen --ensure=/etc/machine-id
In any other case, you can skip the commands above.
Configure the hostname of every box (master, wrk-0x) with the following command:
sudo hostnamectl set-hostname {{HOST_NAME}}.kubernetes.laband update the entries in /etc/hosts in every server accordingly:
sudo cat <<EOF>> /etc/hosts
10.30.10.3 master.kubernetes.lab
10.30.10.4 wrk-01.kubernetes.lab
10.30.10.5 wrk-02.kubernetes.lab
10.30.10.6 wrk-03.kubernetes.lab
EOF
Obviously you have to replace the hostnames and IP addresses with the ones of yours. Remember that you need to set the static IP addresses that the DHCP server of the named NAT Network assigned to your machines.
restart all the machines:
sudo init 6Perform the following steps on every node:
Update Ubuntu
sudo apt-get update && apt-get upgradeAdd Kubernetes repositories
sudo apt-get install -y apt-transport-https ca-certificates curl

curl -s https://packages.cloud.google.com/apt/doc/apt-key.gpg | sudo apt-key add

echo "deb https://apt.kubernetes.io/ kubernetes-xenial main" >> ~/kubernetes.list
sudo mv ~/kubernetes.list /etc/apt/sources.list.d

sudo apt-get update
Install Kubernetes tools
Install the following packages — targeting Kubernetes v1.26 — on every machine:
- kubeadm: the command tool that we are going to use to bootstrap the Kubernetes cluster.
- kubelet: the component that runs on all of the machines in your cluster responsible for starting pods and containers.
- kubectl: the command line tool to interact with your cluster.
export VERSION = "1.26.0-00"

sudo apt-get install -y kubelet=$VERSION kubeadm=$VERSION kubectl=$VERSION kubernetes-cni
sudo apt-mark hold kubelet kubeadm kubectl
Configure IPv4 forwarding and iptables
Add the following kernel modules:
cat <<EOF | sudo tee /etc/modules-load.d/k8s.conf
overlay
br_netfilter
EOF

sudo modprobe overlay
sudo modprobe br_netfilter
and a) configure our linux boxes to forward IPv4 and b) instruct iptables to see bridged traffic:
sudo tee /etc/sysctl.d/kubernetes.conf<<EOF
net.bridge.bridge-nf-call-ip6tables = 1
net.bridge.bridge-nf-call-iptables = 1
net.ipv4.ip_forward = 1
EOF
reload so changes take effect:
sudo sysctl --systemInstall containerd
sudo apt-get update
sudo apt-get install \
    ca-certificates \
    curl \
    gnupg \
    lsb-release -y

sudo mkdir -p /etc/apt/keyrings

curl -fsSL https://download.docker.com/linux/ubuntu/gpg | sudo gpg --dearmor -o /etc/apt/keyrings/docker.gpg

echo \
  "deb [arch=$(dpkg --print-architecture) signed-by=/etc/apt/keyrings/docker.gpg] https://download.docker.com/linux/ubuntu \
  $(lsb_release -cs) stable" | sudo tee /etc/apt/sources.list.d/docker.list > /dev/null
remove the already installed version of containerd (otherwise you will get the following error):
[ERROR CRI]: container runtime is not running: output: time=”” level=fatal msg=”validate service connection: CRI v1 runtime API is not implemented for endpoint ”unix:///var/run/containerd/containerd.sock\”: rpc error: code = Unimplemented desc = unknown service runtime.v1.RuntimeService”
sudo apt remove containerd
sudo apt update
sudo apt install containerd.io -y
sudo rm /etc/containerd/config.toml
sudo systemctl restart containerdDisable swap
sudo sed -ri '/\sswap\s/s/^#?/#/' /etc/fstab
sudo swapoff -a
Make sure not to forget the first command, otherwise disabling swap setting will reset after every reboot!
The bootstrapping of our nodes is now completed. We are ready to initialize our cluster with kubeadm. Perform the following actions on the master node:
Initialize the cluster with kubeadm
Make sure kubelet daemon is enabled:
sudo systemctl enable kubeletand then initialize the cluster:
sudo kubeadm init --v=5 \
--upload-certs \
--control-plane-endpoint master.kubernetes.lab:6443 \
--pod-network-cidr=10.244.0.0/16 \
--ignore-preflight-errors=NumCPU
The CIDR 10.244.0.0/16 is the default one that is used from flannel, that we are going to install later as our network. If you wish using another CIDR, don’t forget to amend as well the flannel’s manifest with the new CIDR value of your choice.
The ignore-preflight-errors clause allows us to use only one vCPU in our VMs, otherwise
kubeadmdemands a minimum of two.
Configure kubectl
sudo mkdir -p $HOME/.kube
sudo cp -i /etc/kubernetes/admin.conf $HOME/.kube/config
sudo chown $(id -u):$(id -g) $HOME/.kube/config
Get the worker nodes join command
Run this command on the master node:
kubeadm token create --print-join-commandRun the output of this command on every worker node. Output might differ depending your kubeadm init configuration , and of course you will see other hashes:
kubeadm join 192.168.1.210:6443 --token zhdfbx.396793mudqat70dj --discovery-token-ca-cert-hash sha256:63a17b1e628200bb32a9b63d70b605214c1337833cc81e1ce6e30d02d8acd8beDeploy Pod Network
Back on the master node. Make sure that all worker nodes have successfully joined the cluster:
kubectl get nodes -o wideAs we mentioned during initialisation, in this lab we are going to go with flannel as our network. If you haven’t chosen another CIDR for the POD Network during kubeadm init then you don’t need to amend the manifest of flannel. Run the following command on the master node:
kubectl apply -f https://raw.githubusercontent.com/coreos/flannel/master/Documentation/kube-flannel.ymlWait until all pods in namespaces kube-flannel and kube-proxy settle to Running state:
kubectl get pods -A -o wideIf you want to observe the changes happening real time and not reissue the command over and over again, just add the clause
-wto the command above.
You cluster is ready to go !
Deploy Kubernetes Metrics Server
Kubernetes Metrics Server measures the usage of CPU and memory across the cluster. It collects metrics in order to provide resource usage statistics for monitoring purposes on cluster, node or pod level and for assisting Horizontal Pod Autoscaler to automatically scale workloads based on quantitates factors.
First install Helm, either on your host or on your master node:
curl https://baltocdn.com/helm/signing.asc | gpg --dearmor | sudo tee /usr/share/keyrings/helm.gpg > /dev/null

sudo apt-get install apt-transport-https --yes

echo "deb [arch=$(dpkg --print-architecture) signed-by=/usr/share/keyrings/helm.gpg] https://baltocdn.com/helm/stable/debian/ all main" | sudo tee /etc/apt/sources.list.d/helm-stable-debian.list

sudo apt-get update
sudo apt-get install helm --yes
and then install the charts of metrics-server:
helm repo add metrics-server https://kubernetes-sigs.github.io/metrics-server/
helm repo update

helm install metrics-server metrics-server/metrics-server --namespace kube-system
Access your cluster from your host machine
If you remember we created our VMs with two NICs. The second one was a Host Network, and this one places the VMs in the same virtual network with our physical host computer. Add the following entries in the /etc/hosts of your laptop:
sudo cat <<EOF>> /etc/hosts
192.168.57.3 master.kubernetes.lab
192.168.57.4 wrk-01.kubernetes.lab
192.168.57.5 wrk-02.kubernetes.lab
192.168.57.6 wrk-03.kubernetes.lab
EOF
Obviously you have to replace hostnames and IP addresses with the ones of yours. Remember that you need to set the static IP addresses that the DHCP server of the Host Network assigned to your virtual machines.
Merge the contents of the .kube/config of the newly created cluster with the the .kube/config in your laptop and now you can use kubectl directly from your laptop pointing the Kubernetes cluster in the virtual machines.
In the next article, we will see how to deploy a Load Balancer on an on-prems Kubernetes cluster:
I hope you found this article useful, stay tuned for more Kubernetes content!
Follow up
If you want to automate and streamline the process, check out how you could pack all those steps above using Vagrant: