Kubernetes multi-cluster implementation in under 10 minutes
Build a mesh of Kubernetes clusters with Cilium ClusterMesh and KIND

TL;DR
After completing this lab, you will have a multiple-cluster Kubernetes environment running as containers in your local development machine.
What do we need?
It is strongly advised to run this lab on a Linux machine, my choice was Ubuntu, as Docker Desktop on MacOS is not exposing the docker network to the host and the effort and complexity required to mitigate this inconvenience is out of the scope of this article.
- kind is a tool for running local Kubernetes clusters that emulates nodes as Docker containers. kind was purposed for testing Kubernetes itself, but can be used for local development or CI pipelines as well:
[ $(uname -m) = x86_64 ] && curl -Lo ./kind https://kind.sigs.k8s.io/dl/v0.20.0/kind-linux-amd64
chmod +x ./kind
sudo mv ./kind /usr/local/bin/kind- Helm, the de facto package manager for Kubernetes:
curl -fsSL -o get_helm.sh https://raw.githubusercontent.com/helm/helm/main/scripts/get-helm-3
chmod 700 get_helm.sh
./get_helm.sh- Cilium CLI, “a CLI to install, manage & troubleshoot Kubernetes clusters running Cilium CNI”, as it’s stated in its GitHub repo:
CILIUM_CLI_VERSION=$(curl -s https://raw.githubusercontent.com/cilium/cilium-cli/main/stable.txt)
CLI_ARCH=amd64
if [ "$(uname -m)" = "aarch64" ]; then CLI_ARCH=arm64; fi
curl -L --fail --remote-name-all https://github.com/cilium/cilium-cli/releases/download/${CILIUM_CLI_VERSION}/cilium-linux-${CLI_ARCH}.tar.gz{,.sha256sum}
sha256sum --check cilium-linux-${CLI_ARCH}.tar.gz.sha256sum
sudo tar xzvfC cilium-linux-${CLI_ARCH}.tar.gz /usr/local/bin
rm cilium-linux-${CLI_ARCH}.tar.gz{,.sha256sum}
You should not mix the Cilium CLI helm mode to enable ClusterMesh or connect clusters configured by the Cilium CLI — they are operating in classic mode — as the two modes are not compatible with each other.
We are not going to use Cilium CLI to install Cilium, but Helm instead. Cilium CLI would come handy afterwards, when we’d need to run some connectivity tests.
What is Cilium ClusterMesh?
ClusterMesh is Cilium’s multi-cluster implementation. It extends the networking datapath across multiple Kubernetes clusters. It allows endpoints that live in different connected clusters to communicate and on the same time it provides full policy enforcement. ClusterMesh provides (excerpt taken from the official article “Deep Dive into Cilium Multi-cluster”):
- Pod IP routing across multiple Kubernetes clusters at native performance via tunneling or direct-routing without requiring any gateways or proxies.
- Transparent service discovery with standard Kubernetes services and
coredns/kube-dns. - Network policy enforcement spanning multiple clusters. Policies can be specified as Kubernetes
NetworkPolicyresource or the extendedCiliumNetworkPolicyCRD. - Transparent encryption for all communication between nodes in the local cluster as well as across cluster boundaries.
Cilium ClusterMesh Use Cases
Common scenarios and applications of multi-cluster Kubernetes setups are cases requiring high availability, fault isolation, scalability, and geographical distribution:
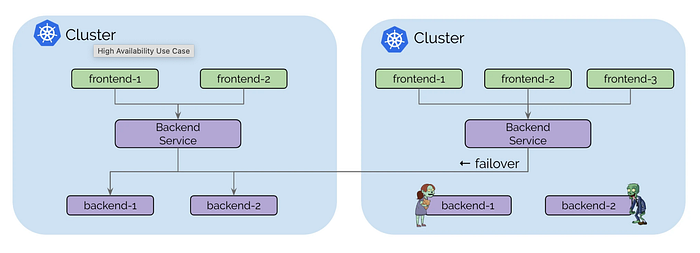
- High availability is the use case we’d come across more often. In this scenario we have Kubernetes clusters running in more than one regions or availability zones and each replica of the same services is deployed in each cluster. In case of failure, the requests can be seamlessly rerouted to other clusters.
This is the use case we are going to focus on in this lab. You can skip the rest of the use cases, they are mentioned below to give you a better understanding of the applications and the real-life problems that ClusterMesh tackles.
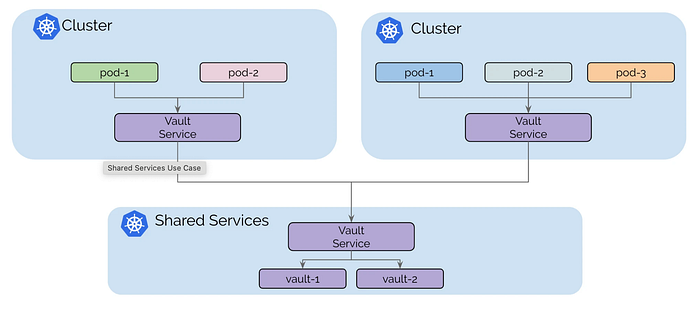
- In multi-tenant Kubernetes clusters the big goal/challenge is the proper isolation among tenants. In order to fulfil this goal, tenant clusters are connected to a shared services cluster but not directly to each other. Common services such as secrets management, logging or monitoring are commonly offered to all tenants via a shared cluster, that all tenant clusters connect to. This eliminates the additional operational overhead to maintain these services in each tenant separately.
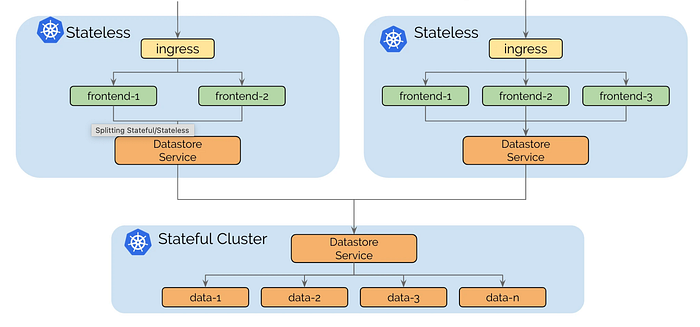
- Stateful services exhibit higher complexity than stateless services due to the storage dependency. Migrating stateful services requires the migration of their respective storage. By running dedicated clusters only for stateless and only for stateful applications gives us the freedom to keep the storage dependency complexity to a smaller number of clusters as the stateful clusters will be segregated from the stateless ones.
Install Kubernetes clusters
As we mentioned above, we are going to simulate the high availability scenario. For that matter, we will run one Kubernetes cluster per region, and we will assume we have two regions: region-athens and region-hurup.
Let’s build region-athens first. Every cluster will need a manifest that will instruct kind how to provision and configure that cluster. Each cluster consists of 1 master & 3 worker nodes. We disable the default CNI, disableDefaultCNI, because we want to provision these clusters with Cilium CNI instead, and we consequently disable the kubeProxyMode as well. Additionally we provide unique CIDRs for the Pods & Services subnets of each cluster:
kind: Cluster
apiVersion: kind.x-k8s.io/v1alpha4
nodes:
- role: control-plane
- role: worker
- role: worker
- role: worker
networking:
  disableDefaultCNI: true
  kubeProxyMode: none
  podSubnet: "10.0.0.0/16"
  serviceSubnet: "10.1.0.0/16"
Save this file as
kind.yamlin a folder calledregion-athens. Keep the artefacts of each region in a separate folder as we are going to create a bunch of them soon.
We can now create region-athens:
kind create cluster --name region-athens --config=region-athens/kind.yamlNow, it’s the turn of region-hurup. Save as well this file as kind.yaml in a folder called region-hurup.
kind: Cluster
apiVersion: kind.x-k8s.io/v1alpha4
nodes:
- role: control-plane
- role: worker
- role: worker
- role: worker
networking:
  disableDefaultCNI: true
  kubeProxyMode: none
  podSubnet: "10.2.0.0/16"
  serviceSubnet: "10.3.0.0/16"
and let’s create now region-hurup:

kind create cluster --name region-hurup --config=region-hurup/kind.yamlThe clusters nodes will remain in
NotReadystate till Cilium is deployed.
Install Cilium CNI
As you might recall, we have disabled the default CNI that kind comes with. We are going to install Cilium instead in each cluster. First let’s get the helm repo and docker image that we are going to need:
helm repo add cilium https://helm.cilium.io/
helm repo update
docker pull quay.io/cilium/cilium:v1.14.2
For region-athens that would require:
kubectl config use-context kind-region-athens
kind load docker-image quay.io/cilium/cilium:v1.14.2 --name region-athens

helm upgrade --install cilium cilium/cilium --version 1.14.2 \
   --namespace kube-system \
   --set cluster.name=region-athens \
   --set cluster.id=1 \
   --set image.pullPolicy=IfNotPresent \
   --set ipam.mode=kubernetes \
   --set kubeProxyReplacement=strict \
   --set nodeinit.enabled=true \
   --set hostServices.enabled=false \
   --set externalIPs.enabled=true \
   --set nodePort.enabled=true \
   --set hostPort.enabled=true \
   --set k8sServiceHost=region-athens-control-plane \
   --set k8sServicePort=6443 \
   --set hubble.enabled=true \
   --set hubble.relay.enabled=true \
   --set hubble.ui.enabled=true \
   --set hubble.ui.service.type=LoadBalancer \
   --set ipv4NativeRoutingCIDR=10.0.0.0/8
We additionally preload the Cilium image on each worker node.
and for region-hurup that would be:
kubectl config use-context kind-region-hurup
kind load docker-image quay.io/cilium/cilium:v1.14.2 --name region-hurup

helm upgrade --install cilium cilium/cilium --version 1.14.2 \
   --namespace kube-system \
   --set cluster.name=region-hurup \
   --set cluster.id=2 \
   --set image.pullPolicy=IfNotPresent \
   --set ipam.mode=kubernetes \
   --set kubeProxyReplacement=strict \
   --set nodeinit.enabled=true \
   --set hostServices.enabled=false \
   --set externalIPs.enabled=true \
   --set nodePort.enabled=true \
   --set hostPort.enabled=true \
   --set k8sServiceHost=region-hurup-control-plane \
   --set k8sServicePort=6443 \
   --set hubble.enabled=true \
   --set hubble.relay.enabled=true \
   --set hubble.ui.enabled=true \
   --set hubble.ui.service.type=LoadBalancer \
   --set ipv4NativeRoutingCIDR=10.0.0.0/8
Cilium must be configured in each cluster with a native routing CIDR,
ipv4NativeRoutingCIDR, that covers all the PodCIDR ranges across all connected clusters. Our clusters’ CIDRs are allocated from the10.0.0.0/8private address space.
Wait till all Cilium related pods reach to Running state or alternatively, validate Cilium’s installation via Cilium CLI:
cilium status --waitInstall MetalLB
First let us retrieve the Docker network that is used by our kind clusters:
docker network inspect kind | jq -r '.[].IPAM.Config|.[0]|.Subnet'In my case that would return 172.19.0.0/16.
Remember that:
— Nodes in all clusters must have IP connectivity between each other using the configured InternalIP for each node. This requirement is typically met by establishing peering or VPN tunnels between the networks of the nodes of each cluster.
— The network between clusters must allow the inter-cluster communication.
We are going to pick a subnet belonging to this CIDR and we are going to split it between the two clusters in each region. For this lab I chose 172.19.255.0/24 and gave the segment 172.19.255.1–172.19.255.100 to region-athens and 172.19.255.101–172.19.255.200 to region-hurup. Let’s use now this information and deploy the load balancers for each region.
For region-athens:
The installation manifest, metallb-native.yaml see below, does not include a configuration file. MetalLB’s components although will start, they will remain idle until we provide the required configuration as an IpAddressPool manifest in region-athens/ipaddresspool.yaml, a new Kind introduced in version 0.13.7 and replaced the old way of provisioning address pools configuration with ConfigMap.
apiVersion: metallb.io/v1beta1
kind: IPAddressPool
metadata:
  name: default-pool
  namespace: metallb-system
spec:
  addresses:
  - 172.19.255.1-172.19.255.100
We are going to use Layer 2 configuration. Layer 2 mode is the simplest to configure and we are going to need only a range of IP addresses. As explained in the official documentation:
Layer 2 mode does not require the IPs to be bound to the network interfaces of your worker nodes. It works by responding to ARP requests on your local network directly, to give the machine’s MAC address to clients.
Let’s create the file region-athens/l2advertisement.yaml:
apiVersion: metallb.io/v1beta1
kind: L2Advertisement
metadata:
  name: default
  namespace: metallb-system
spec:
  ipAddressPools:
  - default-pool
and now let’s bundle all these manifests together:
kubectl config use-context kind-region-athens

kubectl apply -f https://raw.githubusercontent.com/metallb/metallb/v0.13.7/config/manifests/metallb-native.yaml
sleep 240

kubectl apply -f region-athens/ipaddresspool.yaml
kubectl apply -f region-athens/l2advertisement.yaml
Give it a fair amount of time to provision the controllers and speakers,
sleep 240, and then provision the configuration.
For region-hurup, follow the same steps. Create the region-hurup/ipaddresspool.yaml:
apiVersion: metallb.io/v1beta1
kind: IPAddressPool
metadata:
  name: default-pool
  namespace: metallb-system
spec:
  addresses:
  - 172.19.255.101-172.19.255.200
Create the region-hurup/l2advertisement.yaml:
apiVersion: metallb.io/v1beta1
kind: L2Advertisement
metadata:
  name: default
  namespace: metallb-system
spec:
  ipAddressPools:
  - default-pool
and then deploy MetalLB:
kubectl config use-context kind-region-hurup

kubectl apply -f https://raw.githubusercontent.com/metallb/metallb/v0.13.7/config/manifests/metallb-native.yaml
sleep 240

kubectl apply -f region-hurup/ipaddresspool.yaml
kubectl apply -f region-hurup/l2advertisement.yaml
For more information about Kubernetes and MetalLB you can have a look in the article below:
Enable Cilium ClusterMesh
Each cluster must be assigned a unique name and a numeric cluster id (1–255). We assigned those attributes at installation time of Cilium as Helm arguments cluster.name and cluster.id
...
--set cluster.name=region-hurup \
--set cluster.id=2 \
...
If we change the cluster id and/or cluster name in a cluster with existing workloads, all workloads need to be restarted. The cluster id is used to generate the security identity and it will need to be re-created in order to establish access across clusters.
We are going to enable ClusterMesh on both clusters with Cilium CLI. The componentclustermesh-apiserver will be deployed and will create all the required certificates and deploy them as Kubernetes secrets. It will also try to determine which service type would be the best for the LoadBalancer to expose the ClusterMesh control plane to other clusters.
cilium clustermesh enable --context kind-region-athens --service-type LoadBalancer
cilium clustermesh enable --context kind-region-hurup --service-type LoadBalancer
You can validate the status of each request like:
cilium clustermesh status --context kind-region-athens --waitWait until ClusterMesh is enabled in both clusters.
Connect clusters
Last configuration step is to connect the clusters in the two regions:
cilium clustermesh connect --context kind-region-athens --destination-context kind-region-hurupYou don’t need to run the command for each cluster separately, the above command will establish the connection in both directions.
You can validate the status of each request like:
cilium clustermesh status --context kind-region-athens --waitWait until ClusterMesh is enabled in both clusters and then let’s run the full set of connectivity tests via the Cilium CLI:
cilium connectivity test --context kind-region-athens --multi-cluster kind-region-hurupWait till it’s done, it will take some time. If all went well your mesh should pass all the connectivity tests:
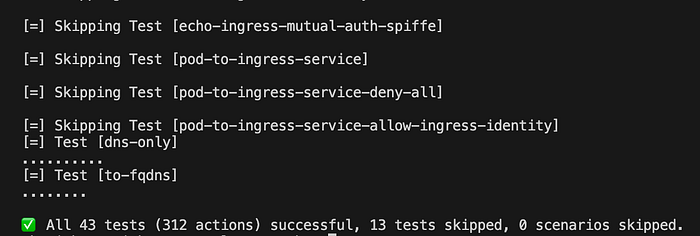
And that was it! If you found this information useful, don’t forget to 👏 under this article and follow my account for more content on Kubernetes. Stay tuned…